Views: 0 Author: Site Editor Publish Time: 2026-01-16 Origin: Site


You want your workplace to be safer and stop injuries from falling objects. Every year, more than 52,000 workers in the United States get hurt by dropped items. These accidents can cause serious damage to property and sometimes even death. Dropped object netting, like dropped object safety nets and Drop Prevention Net systems, helps lower these dangers. The nets catch tools and materials before they hit someone below. If you follow safety steps, you can keep your team and your equipment safe.
Dropped object netting helps keep workers safe. It stops injuries from tools and materials that fall.
You should follow OSHA rules when you put up netting. Make sure nets are not more than 30 feet below where people work. Check the nets often.
Clear the site and look for risks before you start. This helps you find dangers and keep the area safe.
Pick the right netting and anchors for the job. Think about how much weight they hold and the weather. This makes things safer and follows the rules.
Check and fix the netting often. This helps you find damage early. It keeps workers safe and follows safety rules.
Dropped object netting helps catch tools, debris, and equipment that might fall. It acts like a wall between workers and people below. You see this netting in places like construction sites, factories, and warehouses. The netting hangs near where people work. It stops things from falling fast and hurting someone.
Dropped object netting comes in many types and materials. Look at the table below to learn about the main parts and features:
Component Type | Description |
|---|---|
Horizontal Netting Systems | Cable setups with snap-on clips for quick installation, used on construction sites. |
Vertical Netting Systems | Reusable debris panels that attach to cables, built for durability and debris containment. |
Platform Netting Systems | Keeps debris secure and provides fall protection for scaffolding and elevated workspaces. |
Rack Guard Netting | Stops items from falling off racks, important for warehouse safety. |
Material | High-strength polyethylene or nylon, made for impact resistance and long life. |
Key Features | Uses 316 stainless steel, flexible mesh, strong impact protection, and easy to install. |
You find dropped object netting in many places where people work high up. Fall safety netting is used in energy jobs like oil and gas, wind farms, and power plants. You also see it near cranes, scaffolding, and machines above the ground. The netting helps close off areas where tools and equipment could fall.
Workers and equipment are safer from falling objects in construction and factories.
Fall safety netting is used at high worksites where things can drop.
Overhead fixtures are covered to stop tools and equipment from falling.
Dropped object netting is a passive safety system. You do not have to do anything for it to work. OSHA says nets should be close to work areas to stop bad injuries. A tool that weighs eight pounds can fall from 200 feet and hit very hard. Fall safety netting lowers this danger. The World Steel Association says falling objects cause many workplace injuries. Dropped object netting makes work safer and saves lives.
At work, falling objects can be very dangerous. These dangers come from tools, materials, or debris that fall from above. There are two main types of these dangers:
Static dropped objects fall because of wind or shaking.
Dynamic dropped objects fall when someone moves or handles them.
Risks also happen if you put too much on cranes or stack things wrong. Not learning about fall protection can make accidents more likely. If you do not tie down your tools or use equipment the wrong way, it is more risky. Mistakes with lifts, cranes, or scaffolding can cause things to fall. Broken equipment makes the danger worse.
Even a small tool, like an eight-pound wrench, can fall from 200 feet and hit as hard as a small car. This can hurt someone badly or even kill them. Using fall safety netting helps stop these injuries and keeps everyone safe.
You can see how well fall safety netting works by comparing it to other safety tools. The table below shows how each system helps keep people safe:
Safety Measure | Type of Protection | Effectiveness in Preventing Injuries | Collective Protection |
|---|---|---|---|
Fall Safety Netting | Passive | High | Yes |
Harnesses | Active | Moderate | No |
Guardrails | Passive | Moderate | No |
Fall safety netting is special because it always works. Workers do not have to do anything for it to help. It is very important for keeping construction sites safe.
You have to follow strict rules when putting up fall safety netting. OSHA makes these safety rules. Nets must be no more than 30 feet below where people work. You need to check the netting for rips, loose threads, or other problems. OSHA says you must drop-test the netting when you put it up and every six months after that. You should also check the nets every week to find damage early. Doing these things keeps workers safe and helps you follow the law.

You must start by making the work area safe before you begin installation. Follow these steps for a clean and secure site:
Check the land and spot any hazards that could cause problems.
Get all permits needed to meet local rules and requirements.
Plan how you will clear away plants, rocks, and trash. Pick the right tools for the job.
Remove all debris and old structures. Make sure the ground is flat and clear.
Do a final check to confirm the area is ready for installation.
You should also inspect scaffolds and anchor points for any damage. Use only strong anchor points. Do not use light scaffolding or wooden planks. These steps help you create a safe place for your team.
A good risk assessment helps you find dangers and prevent accidents. Use this process for a thorough check:
Identify all hazards in the area.
Think about who could get hurt and how.
Decide how risky each hazard is and choose ways to control them.
Write down what you find.
Review your plan often and update it if things change.
You can also look for hidden dangers that you might miss during normal checks. This method helps you follow safety rules and keeps your team alert. You lower the chance of accidents and avoid losing time or money.
You need to pick the right netting and anchors for your job. Look at the table below to help you choose:
Criteria | Description |
|---|---|
Load Capacity | The netting and anchors must hold at least 5,000 pounds per worker or have a safety factor of two. |
Location | Choose spots that let you attach and remove netting safely. |
Environmental Conditions | Pick materials that resist rust and weather. Check temporary anchors for stability. |
Duration of Use | Use permanent anchors for long jobs. Use temporary anchors for short projects. |
Qualified Person | Make sure a trained person checks the strength and setup of each anchor. |
Type of Work | Match the anchor type to your job. Use mobile anchors for moving work and permanent ones for fixed tasks. |
Select netting with the right mesh size and strength for your needs. This comprehensive guide helps you meet all safety netting requirements and keeps your installation safe.
You need certain tools to put up dropped object netting safely. Use a strong ladder or scaffold to reach high spots. A measuring tape helps you check the space and plan where things go. Bring tough pliers and wire cutters to cut and fix the netting. Wrenches and ratchets are good for making bolts tight and putting in anchors. You will need a hammer drill to make holes in concrete or steel. Always have a marker or chalk to mark where anchors should go. These tools help you do each step in this guide.
Picking the right netting is important for safety and following rules. The table below shows the main types and what they do:
Type of Fall Safety Net | Purpose | Specifications |
|---|---|---|
Personnel Safety Nets | Catch workers who fall from heights. | Must meet specific load ratings. |
Debris Containment Nets | Stop tools and materials from falling on people below. | Designed to withstand falling debris. |
Vertical Safety Nets | Block falls along rooftops or open edges. | Installed along edges for safety. |
Custom Industrial Nets | Fit unique shapes or large areas. | Specifications vary by application. |
When you pick safety netting, look at these things:
Mesh size: Small mesh keeps small things from falling.
Rope material: Can be polyethylene, polypropylene, or polyester.
Border rope strength: Strong edges last longer.
UV resistance: Needed if you work outside.
Load rating: Must follow breaking-strength rules.
You must wear the right safety gear when you install netting. Put on a hard hat and safety glasses to keep your head and eyes safe. Gloves protect your hands from getting cut. Wear a harness if you are working high up. Keep all small tools in pouches with double locks. Make sure heavy tools have the right places to attach them. Always check your gear to see if it is safe before you start.
Tip: Look at your safety gear before every use. Get new gear if you see any damage or if it looks old.
First, measure the area where you will put the fall safety netting. Use a tape measure to find out how long and wide the space is. Write these numbers down so you know how much netting you need.
After you check the site, you need to decide where the netting goes. Put the safety nets under the work area. They should be 10 to 15 feet from the edge. This helps catch things that fall and lets people work safely above. Make sure nothing blocks the nets so they can work right.
Make a plan before you start working. The plan should show where the netting will go and how you will attach it. List all the tools and materials you need. Everyone on your team should know the plan.
Look for fall hazards by checking the whole site.
Put the safety nets 10 to 15 feet from the edge.
Use strong anchors to hold the nets to the building.
Pull the nets tight so they work well.
Check and fix the nets often to keep them safe.
The plan helps you find dangers and pick the best ways to keep workers safe. Many jobsites and rules say you must have a plan. It is not enough to just have a plan. Workers must also understand what the plan says.
Clear the work area before you start. Take away all tools, trash, and other things from the space. Look for anything that could block the netting or make it hard to put up. Make sure the ground is flat and safe for everyone.
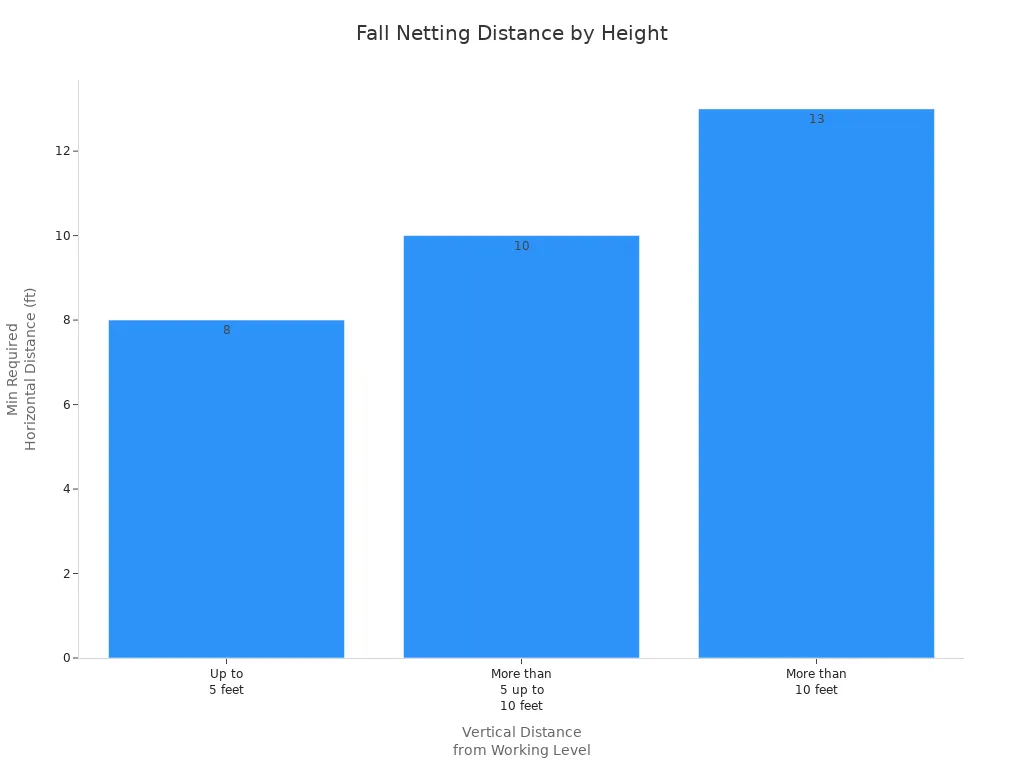
Check the table to see how far the netting should be from the edge, depending on how high you are working:
Vertical Distance from Working Level | Minimum Required Horizontal Distance from Edge |
|---|---|
Up to 5 feet | 8 feet |
More than 5 feet up to 10 feet | 10 feet |
More than 10 feet | 13 feet |
Look for weak spots in the floor or walls. Check for sharp edges that could cut the netting. Inspect the safety nets every week for damage or wear. Take out any broken parts right away. Remove all tools and trash from the net before each new work shift.
Anchors keep the netting in place. Use strong anchors that can hold heavy weight. Do not use weak scaffolding or wood planks. Pick steel hooks or shackles that are very strong. These parts must meet safety rules.
The material is strong and does not break easily, even with heavy use.
Forged steel hooks or shackles are best for holding nets to supports.
Rigging hooks and shackles are used in lifting and are made from strong steel.
These products are tested to hold twice as much as they need to.
They are made to be four times stronger than the heaviest load.
Here are the steps to put in anchors:
Pick the right fall safety netting for your job.
Clear the area and make sure it is safe.
Attach the netting to anchors or hooks around the edge. Make sure it is tight and use cables or ropes for support.
Test the netting by dropping something on it.
Check and fix the netting often.
Now, attach the netting to the anchors. Start at the top anchor point. Use strong zip ties, clips, or rope. Secure the top edge first. Move across the area, pulling the net tight as you go. Pay extra attention to corners and joints. Use more fasteners in these spots, about 10–15 cm apart.
Requirement | Specification |
|---|---|
Maximum Mesh Size | Does not exceed six inches square |
The holes in the net should not be bigger than six inches square. This stops small tools and debris from falling through. Put the netting flat under the work area. Make sure it covers all the danger zones and overlaps at the edges. Attach the netting to anchors with hooks, carabiners, or straps. Pull the net tight so it does not sag. Do not pull too hard or you might break the net or the building.
Keep the netting close to where people are working. It should not be more than 30 feet below the workers. Leave space under the net so it can stretch if something falls. This keeps things from hitting the ground.
Check the netting while you are putting it up and after you finish. Make sure the net hangs with enough space so it does not touch anything below. The space you need depends on how much weight the net can hold.
After you finish, test the net by dropping a heavy weight on it. The net must catch the weight without breaking.
Make sure there is enough space under the net so it does not hit anything if something falls.
Check the netting every week. Look for rips, loose threads, or broken anchors. Take out any damaged parts right away. Remove all tools and trash from the net before each work shift. Write down every check and repair you do.
Tip: Checking and fixing the netting often keeps it strong and safe. This protects workers and follows all safety rules.
If you want to put up netting at home, always follow these steps and use the right materials. This keeps everyone safe and helps you follow the rules.
You need to check the netting right after you finish installing it. Walk around the whole area and look at every part of the net. Make sure all anchors, hooks, and fasteners are tight and secure. Look for any rips, loose threads, or weak spots in the net. Drop-test the netting to see if it can hold a heavy object without breaking. Write down what you find in your inspection log. This helps you follow safety protocols and keeps everyone safe.
You should inspect your dropped object netting at least once a week. Look for signs of wear, damage, or anything that could make the net weak. If you see any problems, take the net out of service right away. Always check the net after something falls into it or after bad weather. Clear away any tools or debris from the net before the next work shift. Drop-test the netting after you move it, fix it, or every six months if it stays in the same spot.
Here is a quick checklist for routine maintenance:
Inspect the net weekly for damage or wear.
Remove any defective nets right away.
Clear out tools and debris before each shift.
Drop-test after installation, repairs, or every six months.
Tip: Regular checks help you spot problems early and keep your team safe.
You may find problems like loose bolts, screws, or brackets. These can happen because of rust, shaking, or weather. Check all parts often to make sure they stay tight and strong. Pick nets that are tough and can handle heavy loads. If you find a problem, fix it right away or replace the net. Never use a damaged net. Regular inspections help you catch these issues before they become dangerous.
Note: Good maintenance and quick repairs keep your safety netting strong and reliable.
You need to keep good records to show that your fall safety netting meets all rules. These records help you prove that you follow safety laws and protect your team. You should collect details about each net and keep them in a safe place. Good documentation makes inspections easier and helps you track the history of your equipment.
Here is a table that shows what you should record for each safety net:
Requirement | Description |
|---|---|
Name of manufacturer | The company that made the net. |
Identification of net material | The type of material used in the net. |
Date of manufacture | The day the net was made. |
Date of prototype test | The day the net passed safety tests. |
Name of testing agency | The group that tested the net for safety. |
Serial number | The unique number for each net. |
On-the-job record | Includes serial number, installation date, inspection dates, and removal orders. |
Tip: Keep these records up to date. You can use a logbook or a digital file to store them.
You must train your team so everyone knows how to install and care for dropped object netting. Training helps workers spot dangers and use nets the right way. You can use many types of training to keep your team safe:
Dropped Object Prevention Training uses videos and toolbox talks to teach safety.
Toolbox Talks focus on tool safety and how to stop things from falling.
Structured Training Programs, like those from NLG Safety Academy, offer classroom and online lessons.
You should update your training at least once a year. If you change your work methods or have an accident, you need extra training. Regular reviews help you see when your team needs more help.
Remember: Good training and up-to-date records keep your workplace safe and help you follow the law.
You can keep your team safe if you follow each step. Install dropped object netting the right way. Use both passive and active controls to stop things from falling. The table below shows how they are different:
Type of Control | Description |
|---|---|
Passive Controls | Toe boards, netting, and barricades that work without worker action. |
Active Controls | Tool connectors, lanyards, and topped containers that need worker use. |
Check your netting often to make sure it is safe. Follow all safety rules and standards. Regular checks help you find dangers before someone gets hurt. Training your team helps everyone learn about safety. When you put up netting the right way, you save lives and stop expensive damage.
You should check your netting every week. Always look for damage after something falls or after bad weather. Write down each inspection in your logbook.
No, you should not reuse netting that caught a heavy object. Remove it right away. Replace it with new netting to keep everyone safe.
The largest mesh size you can use is six inches square. This size stops small tools and debris from falling through the net.
Yes, you need training before you install netting. Training helps you learn the right steps and keeps you safe on the job.


